Like Photography?
Join The Port Charlotte Photo Adventures Camera Club!
Monthly Meetings, Field Trips, Image Exhibition, Competitions, Education & FUN!
Resolution
By T. Zinneman
If you use a computer, you probably encounter the word resolution on a daily basis. For example, if you use your scanner, you need to set the resolution to scan an image. If you have a digital camera or are planning to purchase one, one of the major parameters of interest is the camera’s resolution. Occasionally, you adjust your computer monitor’s screen resolution. Finally, if you want to print a digital image, you need to know the resolution of your printer.
Thus, as you can see, resolution can be a confusing topic. Much of this confusion has been caused by hardware manufacturers and software producers. They use the term to refer to two different aspects of digital images: the total number of pixels or pixel count, and the number of pixels per unit length or pixel density.
To understand the term resolution, you must first understand what a pixel is. Every digital image, such as displayed on your camera or monitor, is composed of thousands or millions of tiny squares called picture elements. The word pixel is a shortened form of picture element. Usually, one cannot see the individual pixels of an image, because they are quite small. However, it is possible to enlarge an image so that individual pixels can be seen.
The size of a digital image is specified by the total number of pixels it contains. This number is the product of the length of the image (in pixels) multiplied by the height (in pixels). For example, if an image is 1600 pixels wide by 1200 pixels high, the total number of pixels is 1,920,000 (1600 x 1200) or 1.92 megapixels. The pixel count gives us an idea of the image size, but it doesn’t give us any information about the quality of an image.
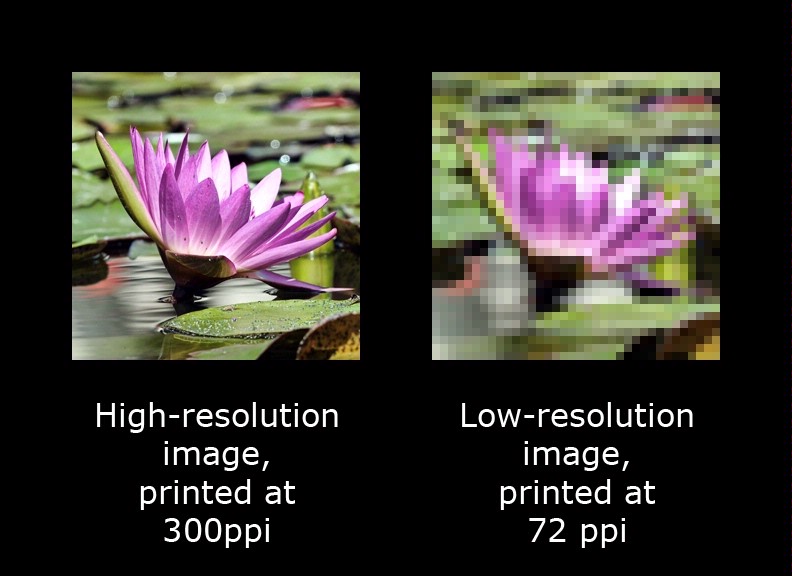
Pixel density, however, tells us something about the quality of the image. It tells us how closely the pixels are packed together, which is directly related to the amount of detail in the final image. For example, an image displayed on a monitor usually has a pixel density of about 70 pixels per inch (ppi). A good image generated by your printer may have a pixel density of 300 ppi. However, density alone doesn’t provide any information about the size of the image. When we combine the pixel count with pixel density, we can get a better understanding of the overall quality and dimensions of an image.
Let’s look at the scanner again. One of the most important parameters to adjust is the resolution. In this case, the resolution refers to the pixel density or pixels per inch. The number to use depends on how much detail one hopes to capture during a scan. For example, a setting of 300 ppi is more than adequate for scanning color photographs and text documents. If a text document has very small print, one may have to scan at 500 or 600 ppi to obtain a good facsimile of the document. Film negatives and color slides, on the other hand, have a great deal of inherent detail. These should be scanned at 2000 ppi or higher to adequately capture all of the detail.
When discussing digital cameras, manufacturers generally print the resolution in megapixels, that is, the total pixel count. Thus, you have 3-megapixel cameras, 4-megapixel cameras, etc. The megapixel count tells you how many pixels the camera sensor has and the resultant image size in pixels. With the total pixel count, one is usually given the length and height of the resultant image in pixels. A 3-megapixel camera will usually produce an image 2048 pixels wide by 1536 pixels high. Note that no information is available on the pixel density.
Scanners and cameras are both input devices, that is, their function is to capture an image. Now let’s look at our traditional output devices, the monitor and printer.
The resolution of the monitor screen is usually given in the form of a pixel count, that is , the active screen area is so many pixels wide by so many high. A 15-inch monitor is usually adjusted to a resolution of 640 x 480 pixels or 800 x 600 pixels. A 17-inch monitor is usually adjusted to a resolution of 800 x 600 pixels or 1024 x 768 pixels. Because the monitor screen is a fixed size, we can calculate the pixel density. For example, the active screen of a 17-inch monitor measures 12 inches wide. If the resolution is set for 800 x 600 pixels, there are 800 pixels across the width of the screen. The pixel density can be calculated (800/12) to be about 67 pixels per inch. Thus, for our 17-inch monitor, we know that it can display a 800 x 600 pixel image at about 67 pixels per inch. If the image we want to display is 1600 x 1200 pixels, it is obviously too big and we will only see part of it on the screen. To see the whole image on the screen, it will have to be reduced in size.
Now let’s look at printers. Modern inkjet printers have resolutions of 2400 x 1200 dpi, 4800 x 1200 and 5760 x 1440 dpi. Note that these resolutions are dots per inch (dpi), not pixels per inch. A printer must lay down several overlapping dots to produce one pixel. Thus, dpi is not equal to ppi.
How many pixels per inch are needed to obtain a good print, that is, a printed image without visible jagged edges. A commonly accepted rule of thumb is 300 ppi. However, that value really depends on the quality of your printer and the associated printing software. I have found that I can produce very acceptable 10 x 8-inch prints from a 1600 x 1200 pixel image. This works out to 160 ppi (1600 pixels / 10 inches). However, you usually need somewhere between 200 and 300 ppi to produce an acceptable print.
In summary, the term resolution has two different contexts, pixel count and pixel density. Applying the appropriate context depends on the device being used. Both contexts are required to determine the overall size and quality of an image, especially when generating a printed copy of an image.